Low-Maintenance Kitchen Finishes

Let’s face it; kitchens get a lot of action. To keep your cooking area clean and tidy, it’s essential to pay attention to the types of finishes used throughout the space. Are you tired of scrubbing your flooring, hardware, cabinets, and more? Read on to learn how you can reduce your cleaning time by using these easy-to-maintain finishes.

Flooring

  • Ceramic or porcelain tile is best for high-traffic areas and wet zones, a.k.a. kitchens. Their moisture resistance is unmatched, and they are highly resilient to scratching and staining. Another added bonus? Unlike natural stone, you don’t have to seal ceramic or porcelain tile or use special cleaning agents.
  • Vinyl is ideal in kitchens as it can handle moisture, spills, stains, and more. Cleanup is quick and easy; it is also difficult to scratch. Without grout lines, there is no place for dirt and grime to hide and accumulate.
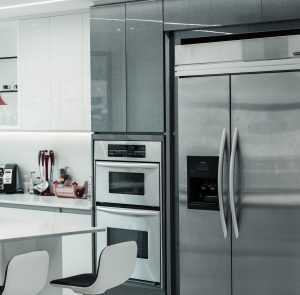
Cabinets

  • Flat-panel doors are so chic right now. The less door detail, the less grime and grease. Since the surface of flat panel doors doesn’t have raised grooves or deep recessions, they are super easy to wipe and clean.
  • Shaker doors are a great alternative to flat panels. These add a touch of detail yet are easy to maintain.

Backsplashes

  • Ceramic and porcelain are again the clear winners here, as they are nonporous and repel water, don’t require sealing, and are generally durable.
  • Glass is super easy to wipe down, thanks to its smooth finish. Though their highly reflective surface shows grease and food more than tile, solid-glass sheets allow you to forgo grout as well, which is a huge advantage.

Hardware

  • Brushed nickel is superior to most metals since its matte finish helps to hide water spots and fingerprints. It’s easy to clean and has a long-lasting appearance.
  • Oil-rubbed bronze doesn’t require much upkeep but does show fingerprints more.

Do you want to replace some of your kitchen finishes to help ease the upkeep? Contact the remodeling experts at JFC today.

JFC Remodeling is committed to providing top-quality home reconstruction services to clients throughout Livingston County. With over 30 years of experience in the industry, our licensed contractors create unique, individualized, and polished renovations. Whether the site requires an improvement, repair, or is a new construction, you can trust our experts to deliver remarkable results. Call: 810-923-1123, e-mail: jfcllc@comcast.net, or visit us at: www.jfcremodeling.com today.

Written by the digital marketing staff at Creative Programs & Systems: www.cpsmi.com.

Five Reasons to Hire a Tiling Professional

Tiling is much more complicated than it might seem. Whether it’s a floor, kitchen backsplash, or bathroom wall, there are several factors to consider before you tackle this project yourself. Do-It-Yourself (DIY) projects can be a nightmare if you don’t have the proper tools, let alone experience. Moreover, installations vary by medium, materials, and square footage.

Many tiles are made from delicate materials and installing them correctly can make a significant difference in the finished product’s lifespan. Hiring a professional to install tile might seem unnecessary initially, but you will be thankful in the long-run. Read on to discover why hiring a professional to tile your home is a better bet.

  • Design Options
    Since professionals install tiles daily, they are familiar with styles, textures, layouts, grout colors, and much more. Industry innovations and updates fluctuate – thus, licensed contractors can effortlessly adapt to changes and know best practices.
  • Speedy Installation
    It should go without saying, but here we are. Hiring a licensed contractor to install tile in your home will undoubtedly be much quicker than a DIY project, as you will have time restraints and schedules to follow. Additionally, an expert will lay tiles at a much faster rate since they are more familiar with the complex process.
  • Proper Equipment
    To install tiles, the tools sitting in your garage or basement probably won’t suffice. Specialists will not only come equipped with all of the right tools – they will also know exactly how to use them. It’s imperative to understand that tiling can be a messy job; letting someone else handle the mud, grout, and cleanup is the way to go. 
  • Reduced Waste
    Remember geometry class? No? Well, the contractor you hire to install your tile will be familiar with geometry to say the least. The progression of measuring, cutting, and fitting tile can be tremendously complicated. To lessen the amount of waste from your project, don’t DIY.
  • Home Protection         
    Hurdles will undoubtedly surface in nearly any home project. Tiling sounds fun and easy, but don’t forget about the dusty, dirty demolition. You might not have the capability to deal with unforeseen issues that arise in a DIY plan. Removing old tile, disposal, protecting trim and walls from damage, and closing off doors to contain dust are just a few of the extra precautions taken by professionals.

Thinking of re-tiling a floor, kitchen backsplash, or bathroom wall? Put the tools down, pick up the phone, and call the flooring experts at JFC Remodeling. Save yourself the headache and let us handle your flooring renovation from start to finish.

JFC Remodeling is committed to providing top-quality home reconstruction services to clients throughout Livingston County. With over 30 years of experience in the industry, our licensed contractors create unique, individualized, and polished renovations. Whether the site requires an improvement, repair, or is a new construction, you can trust our experts to deliver remarkable results. Call: 810-923-1123, e-mail: jfcllc@comcast.net, or visit us at: www.jfcremodeling.com today.

Written by the digital marketing staff at Creative Programs & Systems: www.cpsmi.com.

Choosing Materials for a Bathroom Remodel

Remodeling a bathroom can be exciting yet overwhelming due to the vast amount of available options. Having an overall plan or scheme is ideal; make sure to include a list of goals, priorities, and, most importantly, a budget. It’s all in the details – try to have a crystal-clear vision of what you want the aesthetic to be. Hardware, color scheme, patterns, textures, etc. are some ideas to explore.

How do you sift through hundreds of options to solidify your choice? Specialty design showrooms are a great place to start. They display finished plumbing, flooring, cabinets, lighting, and more. After you narrow down your ideal design, remember to factor in your budget. It’s also a good idea to have a backup or second option if your first choice is unavailable.

Here are some basic suggestions to help you get started:

Flooring
Choose an easy-to-clean, non-porous surface such as tile, ceramic, hardwood, etc.

Countertops
Any tough, durable, solid surface including granite, quartz, marble, and the like will stand the test of time.

Storage
Look for tall and spacious cabinets and sleek shelves to add a functional yet appealing touch.

Lighting
Set the mood with accent lighting, illuminated mirrors, and achieve specific color temperatures with specialty light bulbs.

After you choose the aesthetic of your new bathroom, you can start shopping for materials. Check out the complete article for a more in-depth look at fixtures, countertops, cabinets, flooring, and more.

You have the perfect bathroom planned – now you need the perfect bathroom remodeling contractor. Contact JFC Remodeling for your next bathroom renovation project at 810-923-1123. https://www.jfcremodeling.com/

DIY Tips – Saving Money by Demoing Your Kitchen

You can save a ton of money if you demo your kitchen instead of getting it done; however, it’s not for everyone. Depending on your health and any available help you may have, you might consider paying for your demo work instead. For those considering ripping out their old kitchen on their own, this article gives you a quick rundown of a few tips to follow before grabbing the crowbar and hammer. 

Prep the Space. Turn off the kitchen power supply from your circuit breaker box. A good tip you’ll want to remember is putting a piece of tape over the breaker for the kitchen, so no one accidentally turns them on, giving you an unexpected shock when you reach for an outlet. 

Turn Off the Water. Demo work is messy enough without burst water pipes. Be sure to turn off the supply usually found under the kitchen sink with a value or handle.  

Turn Off the Gas Supply. If you have appliances that run on gas, you will need to turn them off with the valve located behind the appliance. Ensure that you pull the appliance out carefully so not to dislodge the hose out of the valve. 

Rent a Dolly for Heavy Appliances. Don’t break your back, get some assistance by renting a dolly typically found at rental centers or home improvement stores.  

Lay a Drop Cloth on the Floor. This will prevent scratches and other damage. If you are also renovating the floor, you obviously do not have to do this.

Rent a Dumpster. A typical average-sized kitchen will require you to rent a six-cubic yard dumpster. These can be rented from your local waste management centers. 

Now you’re ready to begin the demoincluding the garbage disposal, sink, cabinets, countertops, backsplash, and dishwasher. For the next steps, read more from this article regarding the main kitchen demo.

These are just a few tips on prep work you will need to consider if you plan on remodeling your kitchen. Contact JFC Remodeling for your next kitchen renovation project at 810-923-1123. https://www.jfcremodeling.com/

For a Better Kitchen – 10 Tips to Consider

Whether you are looking for a new home, or considering updating your kitchen, or simply thinking of ways to improve your current setup, read our suggestions below for design and planning ideas.

  1. Eliminate Wasted Steps – Having all your essential items in one place with ease of access is the key here. Think about how and where you use your items. Are your dishes and flatware located near the sink for ease of access when unloading the dishwasher? Are your mugs near the coffeemaker? Simple reorganizations go a long way in overall kitchen functionality and user experience. 
  •  Design Wide Walkways – Typically, paths throughout a kitchen should be at least 36 inches wide. Roads within the cooking zone should be 42 inches wide for a one-cook kitchen and 48 inches wide for a two-cook setup. If your current kitchen space has less than this because of islands or chairs, try to adjust your surroundings to gain a larger working space in essential areas.
  • Direct Traffic – When considering layouts and appliance setup, think about how and where your traffic comes and goes. Try to keep the cooktop out of high traffic areas, so children do not catch handles and cause spills when running through. Position the refrigerator accessible to both the passerby and people working in cooking areas.
  • Stay Clear of Corners – Planning for a cabinet or drawer’s clearance and swing will make them more functional and allow for more breathing room. Try to keep appliances away from corners, and make sure doors will not bang into each other if open at the same time.
  • Optimizing Your Microwave Height – Typically, 15 inches above the countertop is the proper microwave height, although this varies depending on the chef or if you’re trying to be kid-friendly. If children are a factor, a below countertop layout may be safer and more appropriate.
  • Determine the Island’s Function – In the case of kitchen islands, form follows function, and less is more. Ideally, just having one centerpiece (such as a vase or decorative bowl), is more than enough for décor. Keeping this space clear and open allows for an inviting atmosphere that your guests will feel comfortable in. On the contrary, when you have clutter on an island, it can make the entire kitchen seem cramped.
  • Appropriate Landing Space – You should allow 14 inches of countertop on each side of a cooktop, microwave, and refrigerator. Having a landing space near the oven and other kitchen must-haves provides a temporary rest stop for items during prep.
  • Double Up – A second microwave oven, a mini-refrigerator, or a refrigerator drawer placed at the edge of a kitchen work center helps to keep snackers out of the cook’s way. Add a countertop bar with stools for an after-school spot for the kids to snack and do homework.
  • Arrange the Range – Placing a shelf beside or behind the cooktop range keeps cooking oils, utensils, and spices handy. Place S-hooks on the side of the range hood to hang regularly used items like pots and pans.
  1. Fill it Up – Installing a swing-out tap, also known as a pot-filler, can solve the issue of lugging pots around. Or, you can install an extra-long hose attachment on your main faucet to fill pots.

These are just a few ways to make your kitchen more functional and comfortable to spend your time in. If you’re considering remodeling your kitchen, keep these tips in mind; you’ll be glad you did. For more ideas about remodeling your kitchen, click here